
In previous section, we covered how to import an XML file to Excel. In order to do that, you need to activate Developer tab in Excel and we also showed how to activate it with pictures. If you do not know how to activate Developer tab and you directly jumped to this section, I highly recommend you read the previous section first. You can check the previous section from this link.
Because we already wrote lots of information about being prepared before starting to import your XML file in the previous section, this section will contain slightly less writing comparing to the previous section. That is why we will directly start from the subject of how to export an XML file from Excel from this point on.
How to Export an XML File from Excel?
We have prepared a data set in our “Step by Step: How to Prepare A Test Data Set in Excel?” section, and in this section, we will use a similar data set to show how to export an XML file from Excel. Please check the below data set;

If you noticed that there is some false information or let’s say that there is some information seem wrong. For example, in the second row, Elleanor’s age is 130 which seems wrong / a typo maybe. There is another one that in the fifth row, the start date’s format is wrong. It is written as 2020/07/07 but we should have expected that as 07/07/2020. Of course, we will check these values both for their formats and expected value ranges in future. Now, we can just concentrate about how to export our data as an XML file from Excel.
First, I assume that you either have the exact data set as shown above or you prepared a new data set of yours. After your data set is ready, here is the steps to export an XML file from Excel;
- Click the Developer tab on Excel.

2. In XML part of Developer tab, click Source.
3. Click XML Maps and you will see a pop-up box. There, click Add button as shown below.

4. Because we need to provide a schema to Excel, create a sample XML file that Excel use for its exporting data process. Be noticed that information within the schema is not important. The only important thing about the schema is that it should contain minimum 2 values means 2 rows as shown below. Otherwise, Excel won’t recognize your schema and cannot match the data in your sheet to complete the export. Now, the sample XML file is shown below;
<?xml version="1.0" encoding="UTF-8" standalone="yes"?>
<EmployeeTable xmlns:xsi="http://www.w3.org/2001/XMLSchema-instance">
	<EmployeeRow>
		<EmployeeName>Elleanor Carter</EmployeeName>
		<Age>130</Age>
		<StartDate>05/05/2020</StartDate>
		<AnnualIncome currency="GBP">45000</AnnualIncome>
		<Department>IT</Department>
	</EmployeeRow>
	<EmployeeRow>
		<EmployeeName>John Carter</EmployeeName>
		<Age>60</Age>
		<StartDate>05/05/2020</StartDate>
		<AnnualIncome currency="GBP">25000</AnnualIncome>
		<Department>IT</Department>
	</EmployeeRow>
</EmployeeTable>
5. In step 3, you clicked Add button. Now, choose the sample XML file you just created.
6. Excel can show a warning message shown below. Click OK.

7. After that, in XML Maps pop-up window, you can see your sample XML file added. Now, click OK again.
8. In your Excel sheet, select all columns which contains data. Then, in XML Source pane, right click on EmployeeTable and click Map element as shown below;

9. Excel will ask you the exact cell ranges for your data selection as shown below;
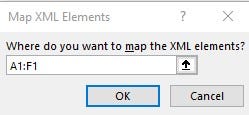
10. Click OK. Now, you mapped your data to your sample XML file and Excel knows how to export all your data to a new XML file.
11. In Developer tab, click Export.
You can also read this blog post to learn how to export an XML file from Excel.
Note: You can also check this blog post and some other interesting topics on my personal web page.
Next: What Is an XSD File? How Do We Use It in Data Validation?
